
Wie aktiviere ich SSH in meinem Hosting?
Go to your Customer Center and select Server Center > Server Center > select “Settings” for your hosting > select “Upgrade Account”.
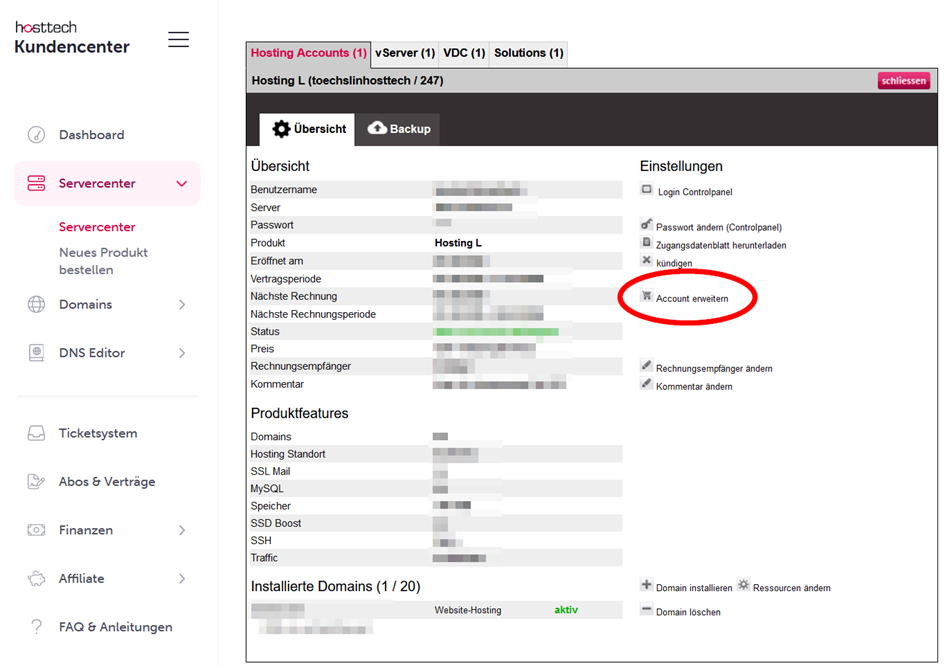
Select “Choose Additional Services,” enable “SFTP/SSH Access,” and click “Upgrade Now.”
Wie aktiviere ich SSH im Plesk?
After you’ve added the add-on, log in to Plesk.
Under “Website & Domains,” select “Hosting and DNS” for the relevant domain. Then click “Hosting.”
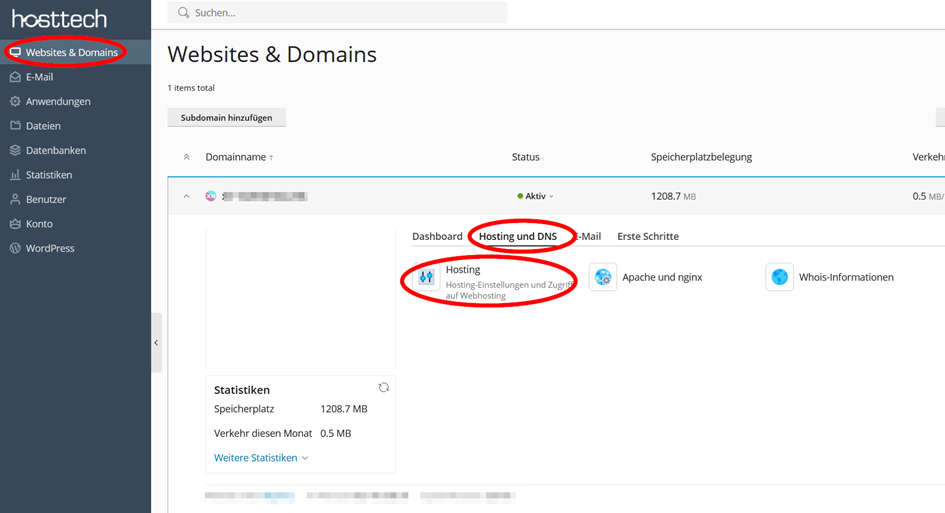
Scroll all the way to the bottom, select “/bin/bash (chrooted)” under “Type” in the SSH access section, and save the changes.

Wie logge ich mich ein?
We recommend using PuTTY or WinSCP to log in via SSH.
The login credentials are the same as those for the main FTP user and can be found in the login credentials sheet, which you can download at any time.
Wie kann ich meinen eigenen SSH Key hinterlegen?
Create an SSH key (if you don’t already have one)
For Linux/macOS:
- Open a terminal. Generate a new SSH key using the following command and save the key
ssh-keygen -t rsa -b 2048 For Windows (with PuTTYgen):
- Download PuTTYgen and launch it.
- Select “RSA” as the key type and “2048” as the key length. Click “Generate” and move the mouse to generate the key. Save the key.
Upload the key to the server manually using PuTTY:
- Connect to the server using PuTTY.
- Check if the .ssh folder exists using the following command:
ls -l- If the folder does not exist, run the following command:
mkdir ~/.ssh
chmod 700 ~/.ssh
- Create the authorized_keys file using the following command:
touch ~/.ssh/authorized_keys
chmod 600 ~/.ssh/authorized_keys
- Paste the contents of your public SSH key into the authorized_keys file using the following command:
echo "dein-öffentlicher-ssh-schlüssel" >> ~/.ssh/authorized_keys